By Angela Sylvaine

Welcome to “Creepy Craft Corner,” which features HWA members who are also artists, crafters, makers, or creators. I hope to provide you, the reader, with the tools and inspiration to try creating something new!
In an extended celebration of Halloween, the most sacred of holidays, I am featuring not just one but three fantastic creators. Today we welcome Mercedes Yardley and her handmade voodoo dolls, M. Lopes da Silva’s spooky soaps, and Robert Perez fashioning an Oogie Boogie costume. Let’s get our creepy craft on!

Hi, Mercedes. Tell us a little about what you write and any upcoming projects you’d like to promote.
I write whimsical horror. I write dark fairytales with a high body count. Most of my work has to do with women put in terrible positions. I like to discuss the important issues that I see around me every day.
I have quite a few things coming out, actually! I have a beautiful, sad story titled “The Rhythm of Grief” that just came out in the FRIGHT TRAIN anthology. My story “Sand and Salt” (about an Irish banshee trapped in the San Rafael desert) is coming out this month in the SHADOW ATLAS anthology. Also releasing this month is the CLASSIC MONSTERS UNLEASHED anthology, which features my story “The Picture of Doriana Gray.” My poem “Afterlife” is coming out in the HWA Poetry Showcase Volume 8 book. And my Southern Gothic novel, DARLING, is releasing in 2022. It’s a wonderfully busy time! They’re all available on Amazon, and you can learn more about them at mercedesmyardley.com.

What creepy craft or creation have you decided to share with us today?
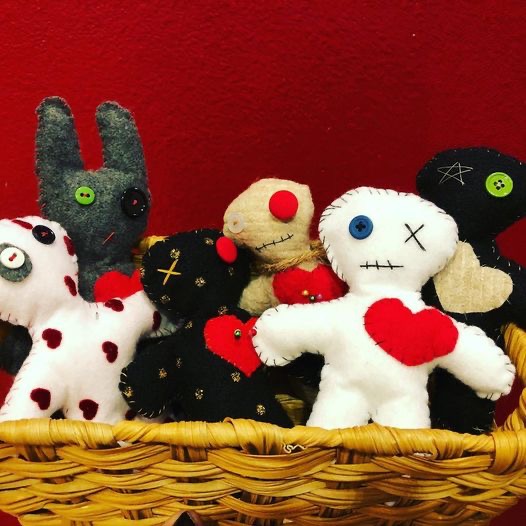
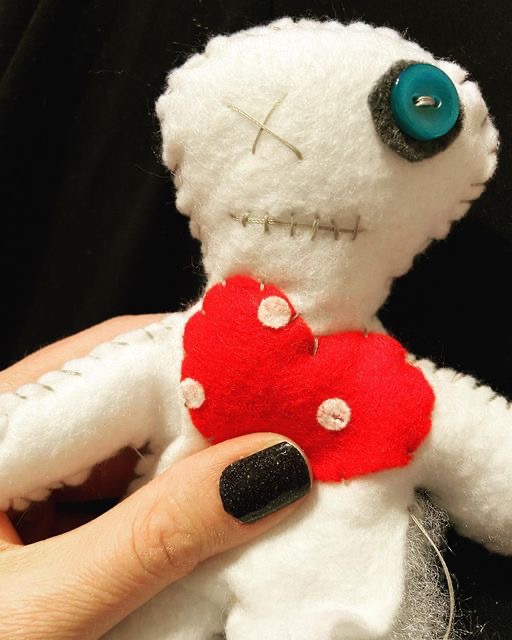
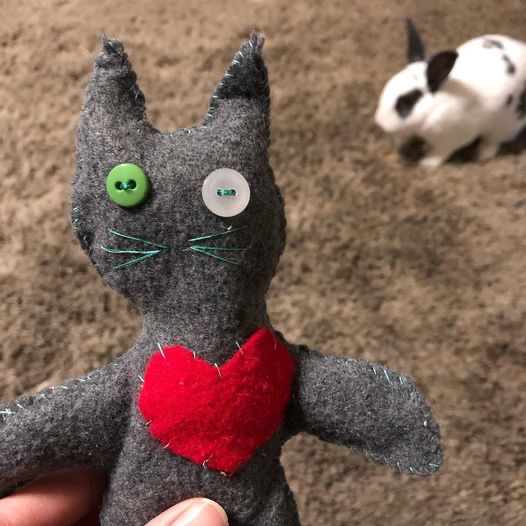
Today I’ll be showing you my handmade voodoo dolls. They’re sweet, sinister, darling things. I started making them several years ago when I needed a craft to keep my hands busy while I watched true crime or Labyrinth. I use felt because it’s a perfect texture for the dolls. Each one has its own unique personality. While most voodoo dolls are full of menace, mine are full of good feeling and just the tiniest bit of malevolence.
These little things sell like you wouldn’t believe. They outsell my books by a large margin. There’s something about having a basket of them on the book table that draws people in. Some people genuinely seem creeped out, but as soon as they hold one, they get over those feelings quite quickly. “They’re cheery little things that want to watch over you,” I’ll say, and then I’ll wave goodbye as a voodoo doll finds its way into its new owner’s pocket or backpack. That really makes me happy. I have one strapped to the neck of my ukulele.
I actually gave a book and matching doll to Lisa Loeb, who is one of my favorite singers. It was an honor to see her cradle these two things I created.
Anyone interested in their own doll can contact me at mercedesyardley@gmail.com, or find me on Facebook at Mercedes Murdock Yardley. They’re currently going for $15 plus shipping.
What instructions or tips do you have for our readers who might be interested in trying this craft for themselves?
First, make yourself a doll pattern out of cardboard or cardstock. Also, make yourself a heart pattern as well. Trace it on felt, cut two pieces out, and then work on the face. You can use buttons. You can use thread or embroidery floss. You can draw on it. Just do the face before you sew it together. Next, sew the heart on. Then you’re ready to hand-sew all the way around the doll. You can use a blanket stitch or any stitch you’d like. Be sure to leave a gap in an inconspicuous place like under the arm. You’ll use that hole for stuffing the doll. You can stuff it with cotton, batting, fabric, grass, or anything you’d like. I also like to take a felt disk and put a few drops of essential oil. I’ll slip it inside with a few special charms, like feathers or stones or good wishes written on paper, and then finish sewing the doll up completely.
Feel free to personalize them! Add bunny ears. Give them stars for eyes. It’s a wonderful, easy way to express your creativity. They’re so much fun.
Next, we welcome M. Lopes da Silva. Tell us a little about what you write and any upcoming projects you’d like to promote.
I’m M. Lopes da Silva (she/they) – a non-binary, bisexual, white Latinx horror author and artist from Los Angeles. I create queer California horror. I like to dip my hand into other genres now and again, but horror is often at the heart of what I make. I have short stories coming up in IN SOMNIO: A Collection of Modern Gothic Horror and ANTIFA SPLATTERPUNK, respectively; two horror anthologies that are going to pack a lot of great indie horror talent between their covers! IN SOMNIO contains a story of mine about a woman losing pieces of her identity to a haunted house in Malibu, while ANTIFA SPLATTERPUNK is going to publish a fictional story about the pressure of rising anti-homeless and hostile architecture in Los Angeles. I also wrote a book called HOOKER that was published by Unnerving Magazine last year. It’s about a bisexual sex worker who hunts a misogynist serial killer through the streets of 1980s Los Angeles using hooks as her weapons of choice. I’m currently working on a fictional novella about a real apartment building I used to live in that had a strangely high rate of awful things happening on and around it all the time.

What creepy craft or creation have you decided to share with us today?
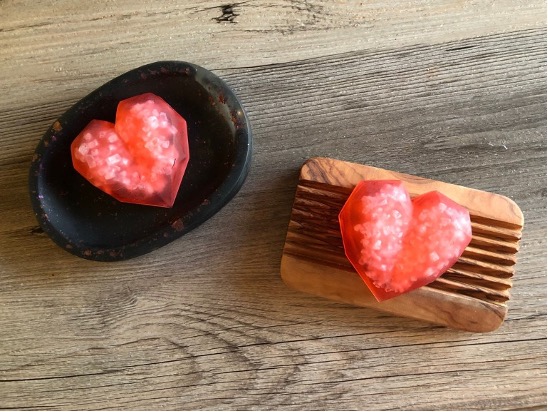
Last year I became a soap maker, acquiring my skills first online and eventually through practice. I’ve become very passionate about soap making, and even started a business this year on Etsy called SaltCatSoap. It’s named after my cat, Luca, and my favorite soap additive – salt! Salt is a wonderful natural exfoliant that’s great for hands and feet, but can be rough on more sensitive areas. Always be careful when trying out a new exfoliant, and be sure to discontinue use if you experience ANY irritation on your skin. With that warning out of the way, I’d like to announce today’s craft project: Lady Macbeth Hand Soap!
These blood-red hand soaps have coarse sea salt in them – perfect for removing any damned spots! – and contain cedarwood essential oil and Siberian fir needle essential oil to invoke Birnam wood’s perfume.

What instructions or tips do you have for our readers who might be interested in trying this craft for themselves?
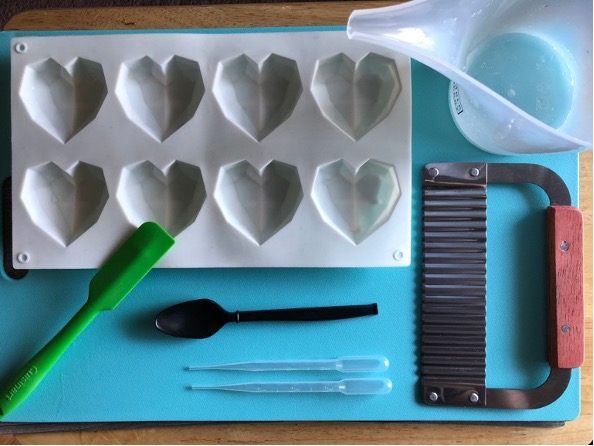
Let’s start by assembling our materials!
Necessary Materials:
-First you’re going to need a silicone mold. I chose this one on Amazon, but feel free to use another vendor or mold shape – the important part is that it’s silicone!
-You’re going to need a long-necked pitcher to microwave your soap in. I like using these from Bramble Berry because they can hold two pounds of soap pretty comfortably.
-You’re going to need something to stir your soap with, and I like to use this silicone spatula that I also bought on Amazon (it’s in a set of three, but you only need one).
-You will need a spoon to add salt to your soap. I just salvaged one from a take out container that I like to clean and reuse, but you can use any spoon. Metal is fine, too.
-You will need pipettes to add your essential oils to the soap – one pipette per oil type. I usually buy a very large quantity of pipettes at once, but you can buy them individually, too.
-You will need something to cut soap with! This is a crinkle edge soap cutter, and if you’re going to really get into soap making I recommend having one, but you can just use a kitchen knife.
Ingredients:
-One pound of clear soap base. I recommend using a brand like Bramble Berry to begin with. It’s stable and lathers very well for melt and pour soap (which is what we are making today).
-Approximately 8 ounces of Coarse Sea Salt. Any brand is fine, but I do not recommend using Dead Sea Salt, because it has a tendency to destabilize your soap.
-Suggested Essential Oil Number One: Siberian Fir Needle Essential Oil from Bramble Berry. One of my favorites, it has a strong, pleasant pine fragrance. If you’re not fond of pine notes, you can omit this one.
-Suggested Essential Oil Number Two: Cedarwood Essential Oil from Wooden Wick. Wooden Wick is a little pricey so I actually recommend getting the same thing from Bramble Berry, especially if you’re picking up other items there at the same time. This wood fragrance is a little musky, and if you’re not fond of musk notes, you can omit this one.
-If you really want to get into soap making, I heartily recommend “Da Bomb Liquid Soap Dyes” from Nature’s Garden. These colorants are wonderful for beginners, and easy to use. The colors pop, and there’s a handy color mixing guide posted on their website.
Optional Materials:
-A bottle of 99% Isopropyl Alcohol (for popping tiny bubbles).
–A small spray bottle that comes with a tiny funnel to fill said small spray bottle with isopropyl alcohol (also for popping tiny bubbles).
Other Stuff You Will Need:
-A microwave to melt your soap base down.
-A clean surface to cut soap on.
-Nitrile gloves to handle the soap if you plan on giving it to others.
Got all your stuff? Awesome! Now it’s time to get to the making!
Step Zero: BEFORE You Start Making
-Whoops! Before we actually start making soap, we need to do some calculations first. Don’t worry, a website is going to do most of the calculating, but first you need to make a couple decisions – are you going to use one essential oil or two? And how strong would you like these fragrances to come across? Once you know the answer, you can use a Fragrance Calculator like the one on the Bramble Berry website to find out how much essential oil is safe to add to your soap. Every respectable soap making website will have one of these, and you should always use the calculator to figure out how much fragrance or essential oil to use.
-The input field will ask what kind of soap you are making – this is a Melt and Pour Soap recipe, and there are sixteen ounces in a pound.
-We went for a “Medium” fragrance range and added about 0.3 ounces of Siberian Fir Needle Essential Oil to our batch. Feel free to adjust according to your own preferences!
- Starting with our clean surface, our soap, and our soap cutter, we unwrap and cut the soap. You want to end up with small cubes that are roughly the same size. I start by cutting the one pound block into four sections.
- Then I cut each quarter in half to form two strips.
- And each strip into quarters.
- Once you’ve cut all your soap into cubes, put it in the pitcher and give yourself a hand.
- Now you need to take the soap to the microwave and start melting it down in 30 second intervals with your regular microwave heat setting. Check after each 30 seconds to see if your soap is melted properly. You don’t want to see any cubes left in the pitcher, but if you overcook your soap it will bubble up a lot. You want it to look something like the next picture. Ta-da! The soap in this pitcher has melted.
- Now to add essential oils and colorants! These are going to give your soap a lot of its character. Luckily, you followed Step Zero and calculated how much essential oil to add at this point, so you just pick up a pipette and carefully add your desired amount of essential oils to your batch, then stir.
- Add colorant one or two drops at a time, stirring as you go, until you get your desired color. I added about 8 drops of Da Bomb Red Dye. Try to mix slowly to avoid a lot of bubbles. Once the colorant and essential oils are added and thoroughly mixed together, it’s time to pour into our silicone mold.
- Make sure that you have your mold, the sea salt, and your spoon ready to go for the next part. Optional materials will be used during the pouring, too.
- Start by pouring a small amount of soap into a mold cavity. Then pause and add a spoonful or two of sea salt.
- Repeat this process: pour some soap, spoon some salt, until the cavity is full. A soap is poured!
- Fill up all the cavities in your mold. If you have soap left over in your pitcher, you can save it for another batch later.
- Now if you want, you can do the stuff that requires optional materials (or just skip to step 11). If you see any tiny bubbles that you don’t want on the back of the bar, spray a little bit of isopropyl alcohol on them and watch them pop away.
- Now you need to wait between 4-6 hours for the soaps to set up in the mold. Try to keep the soap in an area that’s relatively dry or free from humidity, or you may end up with glycerine dewing (harmless drops of moisture on your soap that resemble sweat).
- After 4 or 6 hours have passed, check to see if your soap is ready to unmold by gently tugging the silicone mold away from the side of the soap. If it releases with relative ease, it’s ready to go. If not, you might need to let it sit for a bit longer.
- If the mold pulls away from one side easily, continue to release the soap by tugging all the sides first.
- Remove the soap from the mold cavities!
- You’ve now made a soap fit for a special (regicidal) Lady – congratulations! Any Shakespeare fan would be happy to lather with your lovely creation.
I hope that you’ve enjoyed taking a peek at what goes on behind the scenes at SaltCatSoap, and that you get a chance to visit the store. I have a lot of fun designing these, and we release new horror-inspired soap designs (and normal ones, too!) every first Saturday of the month. If you decide to stop on by, we’ll have Lady Macbeth Hand Soap waiting for you in our Soap to Scream For section, and plenty of cat stickers.
And finally, we have Robert Perez. Tell us a little about what you write and any upcoming projects you’d like to promote.
My work is a tapestry of genres but horror is weaved throughout. Horror is my heart. I currently have something special shortlisted and something to look out for at the end of the year. Follow @_TheLeader on twitter for updates and come say hello!

What creepy craft or creation have you decided to share with us today?
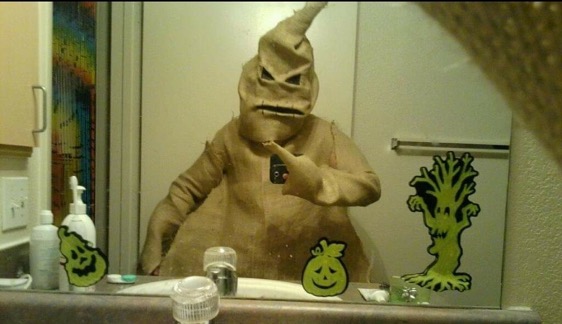
As a child I watched The Nightmare Before Christmas year round and have the movie lines memorized! As an adult I still cherish this movie! One of my favorite opening lines is from Oogie Boogie, “I am the shadow on the moon at night, filling your dreams to the brim with fright!”
The idea of the Oogie Boogie costume coalesced because I wanted materials that would be cheap for construction and burlap was perfectly affordable. I already had a bunch of fake bugs stored away for Halloween that I liked to hide in candy bowls, so I planned on incorporating them in the design.
What instructions or tips do you have for our readers who might be interested in trying this craft for themselves?
The costume construction will require burlap (the amount of which varies depending on body type, but since Oogie Boogie is round the more the better)
Aluminum foil
Poster board or other robust cardboard
Fake bugs
Glue gun/ sewing machine/ needle and black yarn
I drew an overalls-like shape onto the burlap, and flared out the legs like a cartoon cowboy to emulate Oogie Boogie’s shape. The arm sleeves and mask I constructed separately. You can use a glue-gun, sewing machine, or needle and black yarn, whichever you feel comfortable using, however a glue-gun may be required to adhere the fake bugs. A black marker can draw stitches onto the burlap and emulate a hand stitched look. Get creative with the bug placement!
For the mask I first cut out an oval from the rigid cardstock. I then smashed a bunch of aluminum foil together to sculpt the face. Try to make Oogie Boogie’s hard brow and protruding mouth, then glue the back of the foil sculpt onto the cardstock oval. Next glue the burlap over the front of the foil mold pressing it into the crevasses for detail to create a truly awesome mask! Be careful when pressing the burlap over the hot glue as it can easily seep through and burn your fingers! The top of Oogie Boogie’s head has a cone line construction inside of which is a great place to hide a fake spider. Glue the spider to a thread of yarn and then glue the end of the yarn within the cone so that if you throw your head forward the spout will flop forward and the spider will dangle out.
Thank you so much to our three talented writers and creators for sharing your work with us this month! I hope it inspired you to create something new in honor of Halloween.
Until next month, keep it crafty!
Angela Sylvaine is a self-proclaimed cheerful goth who still believes in monsters. Her debut novella, Chopping Spree, is available now. Her short fiction has appeared in multiple publications and anthologies, including Places We Fear to Tread and Not All Monsters. You can find her online angelasylvaine.com.
Special thanks to our logo creator, Maria Abrams abramstheauthor.com
Note: Due to an overwhelming response from talented creators, I am not currently accepting new submissions for Creepy Craft Corner. I will post here in the HWA newsletter and on Twitter when I reopen to submissions.
